


Description
SparkFun Ardumoto Shield Kit - Sparkfun KIT-14180
Robots are fun, and Arduinos are easy. So wouldn't it be nice if there were a kit that included everything you need to get your Arduino device set up to control a simple two-motor-circuit buddy? The SparkFun Ardumoto Shield Kit is perfect for any robot enthusiast and includes an Ardumoto Shield, as well as pairs of tires, motors, connectors, and wires. And, of course, it’s all stuffed in a classic SparkFun red box (which may come in handy as a robot chassis).
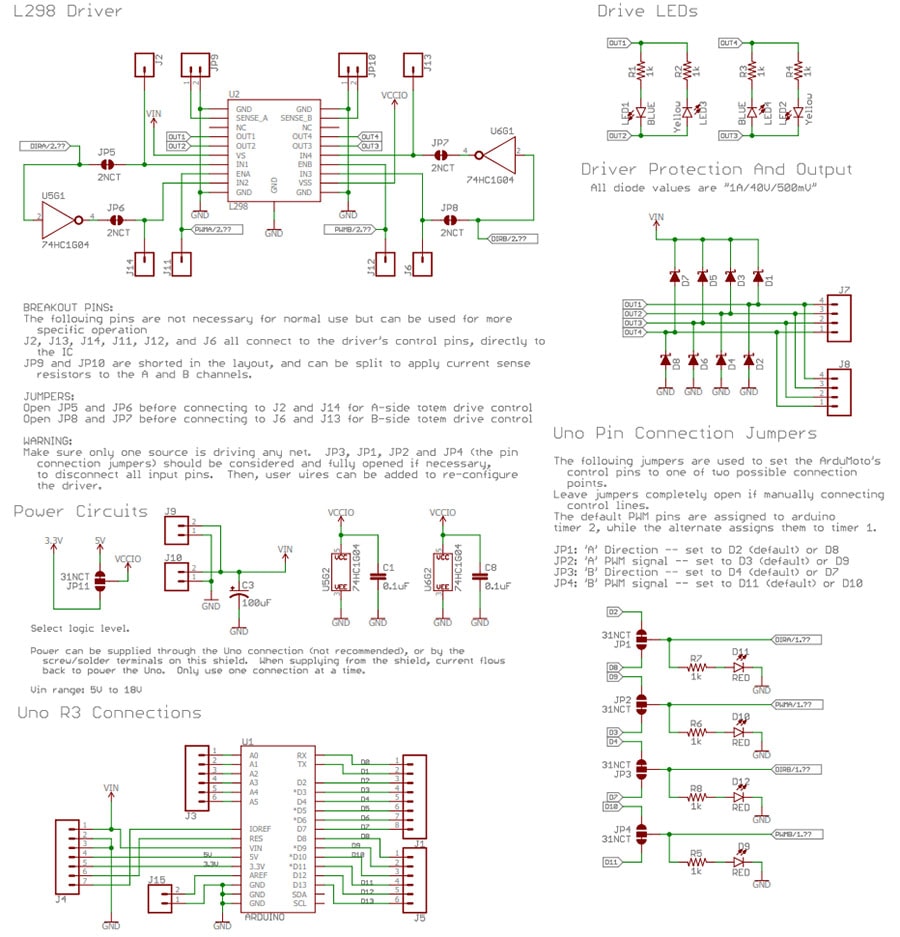
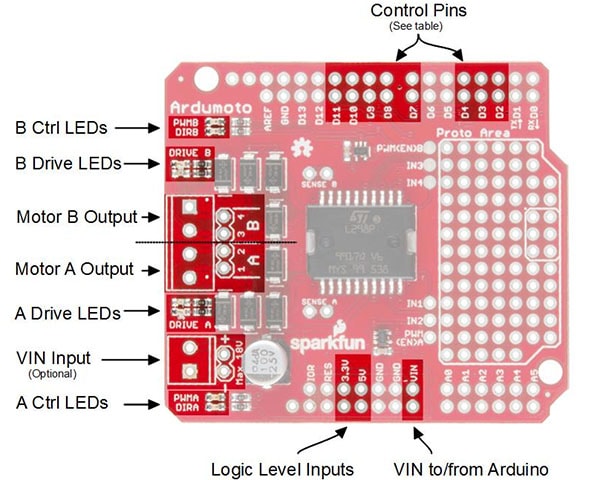
The Ardumoto Shield is an easy-to-use dual-motor controller for Arduino. Combined with an Arduino, the Ardumoto makes a fantastic controller platform for RC vehicles or even small autonomous robots. At the heart of the Ardumoto (the big, black chip right in the middle) is an L298, one of our favorite dual-channel motor drivers around, capable of driving up to 2A per channel. The board takes its power from the same Vin line as the Arduino board and includes blue and yellow LEDs to indicate active direction. All driver lines are diode protected from back EMF.
Ardumoto Shield Kit Includes:
- 1x SparkFun Ardumoto Shield
- 2x Hobby Gearmotor - 200 RPM
- 2x Wheel -- 65mm (Rubber Tire)
- 1x Arduino Stackable Header Kit
- 3x Screw Terminals 3.5mm Pitch (2-Pin)
- 1x 9V to Barrel Jack Adapter
Ardumoto Shield Schematics:
Connecting up the Ardumoto Shield:
Firstly, you'll want to find or purchase a suitable Arduino Uno or compatible board, such as the Red Board: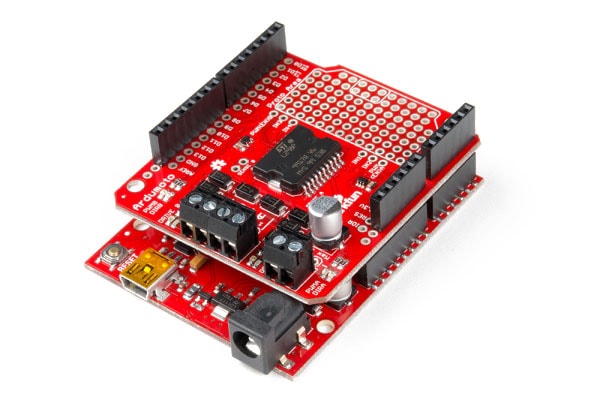
Next you'll need a power source for both the shield and the kit. Batteries are usually your best bet, such as a PP3 9V coupled with the included 9V-to-Barrel Jack Adapter.
The L298 device on the Ardumoto is a two-channel motor driver that can drive up to two motors individually. This makes it perfect for creating two-wheel drive vehicles. You can create more channels by using more than one Ardumoto shield.
Each channel on the L298 can deliver up to 2A to the motor to which it's connected, obviously depending on the power supply that you feed it with. Batteries are great power sources because they're mobile and can discharge a lot of current. However, a high current draw also means they'll drain faster.
Controlling the Ardumoto:
This is very easy. If you've ever blinked or dimmed an LED, you already have all the tools necessary to control the L298 H Bridge.- All of the control signals are limited to a maximum of 7V, which is great because our Arduino is only going to supply a maximum of 5V.
- For each of the L298's channels, there are two types of input we need to send to drive a motor: direction and enable. Each of these inputs are Boolean --- either high or low.
- Using the direction inputs, we can control whether the motor spins clockwise or counterclockwise. The L298 actually has two direction inputs for each channel. However, we've merged those two inputs into one on the Ardumoto, as we'll show in the next section.
- The enable input can be driven either high or low to make the motor spin or stop. But, with Pulse Width Modulation (PWM), we can actually use this input to control the speed of our motor. Just as it can be used to dim LEDs, PWM is perfect for controlling how fast our DC motor spins.
Ardumoto Board and Pin Layout:
Ardumoto Documents:
- L298 Datasheet (H Bridge Driver)
Videos
View AllClose
Related Products


Joystick Shield Kit for Arduino
Sparkfun


Wave Shield for Arduino Kit - v1.1 (94)
AdaFruit


Proto Shield Kit for Arduino Uno (DEV-13820)
Sparkfun


Teensy 3 Arduino Shield Adapter (KIT-15716)
Sparkfun


Adafruit Motor/Stepper/Servo Shield for Arduino v2 Kit - v2.3
AdaFruit