


Description
Breadboard Power Supply 5V/3.3V - SparkFun PRT-00114
This breadboard power supply kit takes power from a DC wall wart and outputs a selectable 5V or 3.3V regulated voltage. The 2.54mm (0.1") headers are mounted on the bottom of the PCB for simple insertion into a breadboard. Pins labeled VCC and GND plug directly into the power lines. The lone pair of pins have no electrical connection but help support the PCB.
There are two pins available within the barrel jack footprint. Any stripped +/- DC supply can be connected instead of the barrel connector. Board has both an On/Off switch and a voltage select switch (3.3V/5V).
Comes as a bag of parts kit and is easily assembled if you can follow the silkscreen indicators and have beginning experience with a soldering iron. You will need to read the resistor bands or use a multimeter to determine the resistor sizes.
Board Dimensions:
- Length: 31.8mm (1.25")
- Width: 31.8mm (1.25")
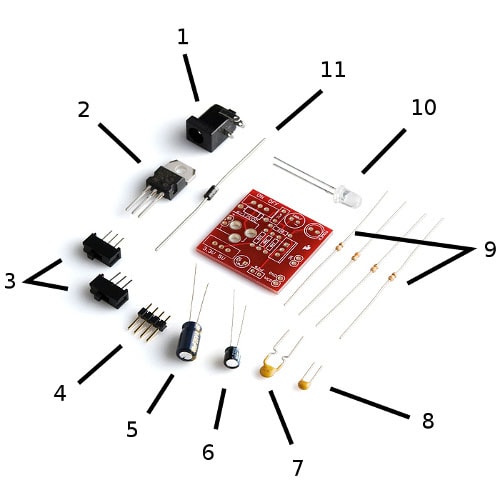
Kit Bill of Materials:
- DC Barrel Connector
- Voltage Regulator (LM317 1.5A max current)
- 2pcs SPDT Slide Switch
- 4pcs 0.1" Header Pins
- 100uF 25V Capacitor
- 10uF 25V Capacitor
- PTC resettable fuse
- 0.1uF 50V Capacitor
- Resistors: 330 Ohm 1/6W - Orange, Orange, Brown X2
- 390 Ohm 1/6W - Orange, White, Brown X1
- 240 Ohm Resistor 1/6W - Red, Yellow, Brown X1
- Red Super-bright LED
- 1N4004 Reverse Protection Diode
- Bare PCB
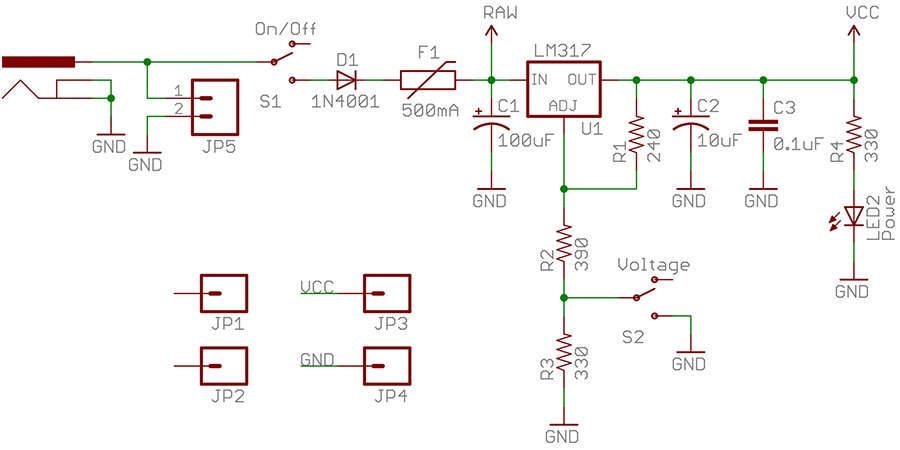
Power Supply Schematic:
Getting Started with Breadboard Power Supply Kit:
The Breadboard Power Supply Kit allows your breadboard projects to easily access a selectable voltage regulated to either 3.3Volts or 5Volts. It receives its power through a DC mains adaptor.
You need some tools to build this kit; a Soldering Iron, some Solder, Wire cutters, and just in case you make a mistake, some Solder wick.
Also, we recommend a Multimeter for testing after assembly.
The parts are soldered in the locations below ensuring that polarized components are fitted in the correct orientation: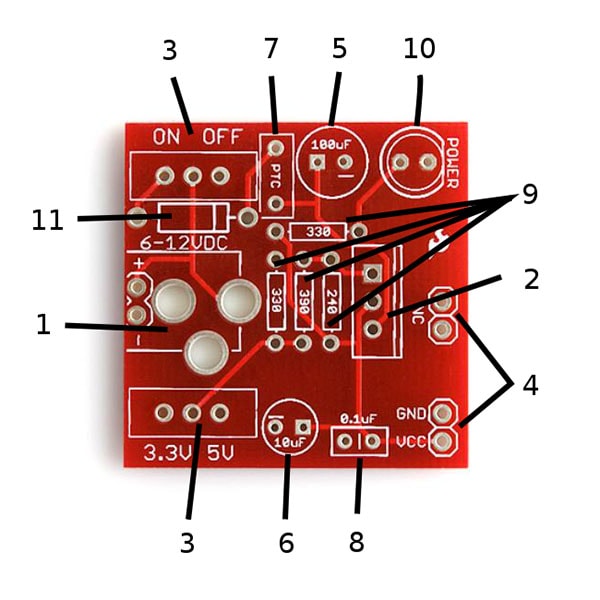
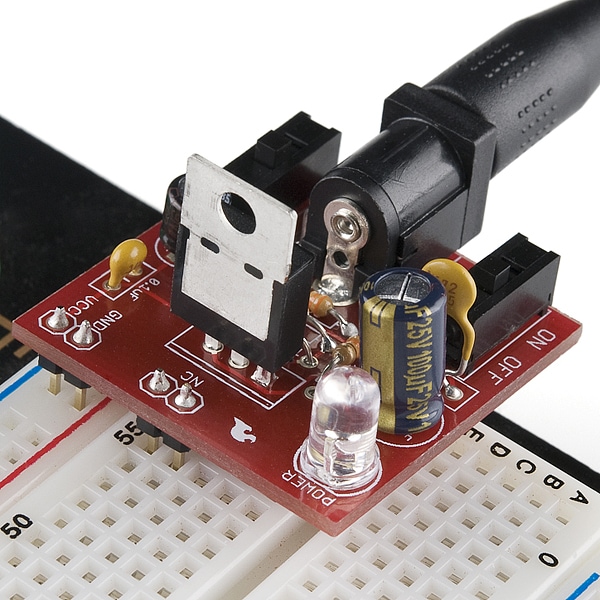
After it's all soldered, it's time to plug it into the breadboard. Line up the VCC and GND header pins with the power rails on the breadboard. The other two header pins should fit into the breadboard as well as shown in the first photo. These two extra pins are only there for physical support and don't have any electrical connection on the PCB.
Once connected to your DC supply, selecting which voltage you want via one of the switches and using the other switch to turn it on. The red LED should light up. Careful, it's bright. Double-check each voltage setting with a multimeter to make sure the proper voltage is being applied to the breadboard (3.3V or 5V depending on the switch settings).
1 Review
-
Title of review 910
Excellent unit and at the price it's not worth buying the components and building one from scratch.Took on board the comments about the LED and fitted a normal intensity device saving the supplied LED for use as a searchlight should I ever need one.I al
Related Products
")

Breadboard Power Supply Stick - 5V/3.3V (PRT-13032)
Sparkfun


Breadboard Power Supply USB - 5V/3.3V (PPPRT-08376)
Sparkfun


Barrel Jack Cable with Inline Power Switch, M-F, 3"
Sparkfun
Barrel Jack Cable with Inline Power Switch, M-F, 3"
Sparkfun


SparkFun Breadboard Power Supply Stick - 3.3V/1.8V
Sparkfun