ESP8266 Thing Dev Board (WRL-13711 / WRL-13804)


Description
ESP8266 Thing Dev Board - SparkFun WRL-13711 / WRL-13804
This is the SparkFun ESP8266 Thing Dev Board, which is a development board that has been solely designed around the ESP8266, with an integrated FTDI USB-to-Serial chip. The ESP8266 is a cost-effective and very capable WiFi-enabled microcontroller. Like any microcontroller, it can be programmed to blink LEDs, trigger relays, monitor sensors, or automate coffee makers, and with an integrated WiFi controller, the ESP8266 is a one-stop-shop for almost any Internet-connected project. To top it all off, the ESP8266 is incredibly easy-to-use: the firmware can be developed in Arduino and uploaded over a simple, serial interface. The ESP8266 Thing Development Board breaks out all of the module's pins, and the USB-to-serial converter means you don't need any peripheral components to program the chip. Just plug in a USB cable, download the Arduino board definitions, and start IoT-ing.
Why the name? We lovingly call it the Thing due to it being the perfect foundation for your Internet of Things project. The Thing does everything from turning on an LED to posting data with phant.io, and can be programmed just like any microcontroller. You can even program the Thing through the Arduino IDE by installing the ESP8266 Arduino addon as per the below instructions.
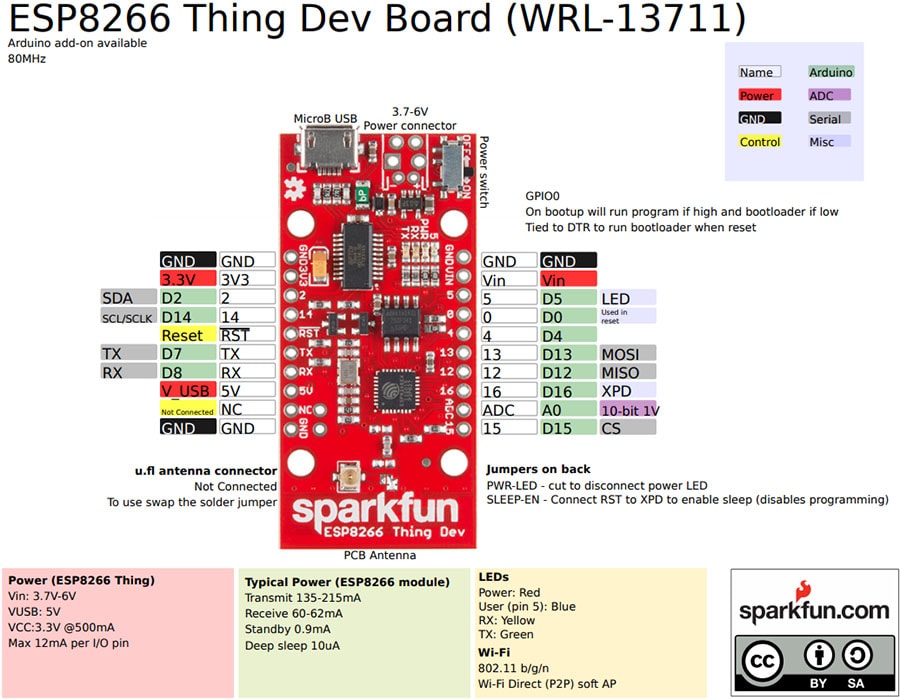
The ESP8266 Thing Development Board is a relatively simple board. The pins are broken out into two parallel, breadboard-compatible rows. The USB connector sits next to an optional power supply input, and an ON/OFF switch controlling power to the ESP8266 sits next to that. And LEDs towards the inside of the board indicate the power, charge, and status of the IC. The ESP8266's maximum voltage is 3.6V, so the Thing has an onboard 3.3V regulator to deliver a safe, consistent voltage to the IC. That means the ESP8266's I/O pins also run at 3.3V, you'll need to level shift any 5V signals running into the IC. If your project requires a power source other than USB, the Thing Dev Board includes footprints for a 2-pin JST, 2-pin 3.5mm screw terminal, or a simple 0.1"-pitch 2-pin header. Unlike the original ESP8266 Thing, the ESP8266 Thing Dev Board does not have a built-in LiPo charger.
The Thing Dev Board even includes a PCB trace antenna as a default WiFi antenna, it's cost-effective and actually works really well! If you need to connect a more sensitive antenna, or need to route outside an enclosure, a U.FL connector is also available on the board. Some soldering will be required to get the U.FL connector functioning but instructions can be found in the Hookup Guide we have written for the dev board.
ESP8266 Thing Dev Board Pin Out:
Features:
- All module pins broken out
- On-board FTDI USB-to-Serial
- 802.11 b/g/n
- Wi-Fi Direct (P2P), soft-AP
- Integrated TCP/IP protocol stack
- Integrated TR switch, balun, LNA, power amplifier and matching network
- Integrated PLLs, regulators, DCXO and power management units
- Integrated low power 32-bit CPU could be used as application processor
- +19.5dBm output power in 802.11b mode
Getting Started with the ESP8266 Thing:
Installing the Addon With the Arduino Boards Manager:
With the release of Arduino 1.6.4, adding third-party boards to the Arduino IDE is easily achieved through the new board manager. If you're running an older version of Arduino (1.6.3 or earlier), we recommend upgrading now. As always, you can download the latest version of Arduino from Arduino.cc
To begin, we'll need to update the board manager with a custom URL. Open up Arduino, then go to the Preferences (File > Preferences). Then, towards the bottom of the window, copy this URL into the "Additional Board Manager URLs" text box:
http://arduino.esp8266.com/stable/
package_esp8266com_index.json
If you already have a URL in there and want to keep it, you can separate multiple URLs by placing a comma between them. (Arduino 1.6.5 added an expanded text box, separate links in here by line.)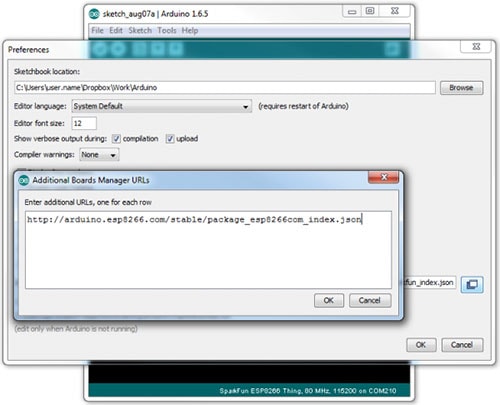
Hit OK. Then navigate to the Board Manager by going to Tools > Boards > Boards Manager. There should be a couple of new entries in addition to the standard Arduino boards. Look for esp8266. Click on that entry, then select Install.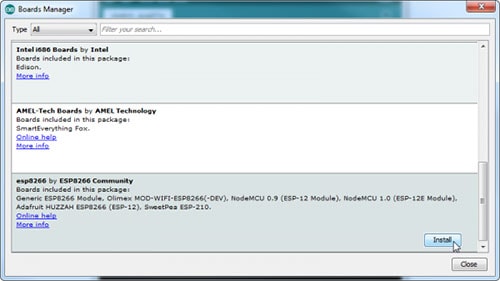
The board definitions and tools for the ESP8266 Thing include a whole new set of gcc, g++, and other reasonably large, compiled binaries, so it may take a few minutes to download and install (the archived file is ~110MB). Once the installation has completed, an Arduino-blue "INSTALLED" will appear next to the entry.
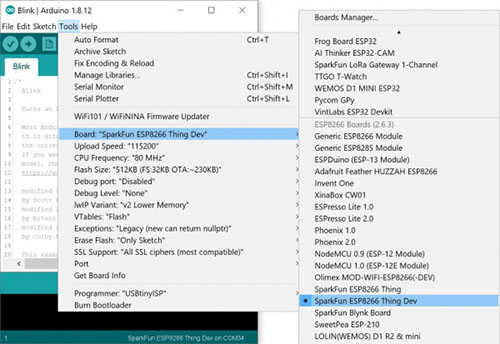
Selecting the ESP8266 Thing Dev Board:
With the Board addon installed, all that's left to do is select "ESP8266 Thing Dev" from the Tools > Boards menu.
Documents:
- Schematic
- Example Sketch: Web Server
- ESP8266 Powered Propane Poofer
- GitHub (Arduino Library)


Related Products


ESP32 WROOM Development Board, Low Power, Dual Core
Proto-PIC


PJRC Teensy 3.2 - Cortex-M4
Sparkfun


ESP8266 Thing Breakout Board (WRL-13231)
Sparkfun

USB Cable - USB A to Micro B Various Lengths
Proto-PIC


ESP32 Thing, Sparkfun Development Board (DEV-13907)
Sparkfun