How to Make a Tilt Indicator (Using 1Sheeld+ and an Arduino)
Do you want to get started using the 1Sheeld+? Why not make a simple phone tilt indicator?
The 1Sheeld+ is an arduino shield that connects to your phone via a bluetooth app, allowing your phone's sensors to interact with the arduino hardware. We will be using the accelerometers built into your phone to create a tilt indicator which lights up an LED when you tilt your phone in a particular direction

What You'll Need
You'll also need a phone with bluetooth, computer with internet connection, and a wire to plug your arduino into the computer.
Software
First you'll need to have the arduino IDE installed on your computer. If you don't have it installed then head to https://www.arduino.cc/en/Guide and follow the instructions there, you can't use the online editor for this. Secondly if you don't have the 1Sheeld arduino library head to https://1sheeld.com/downloads/ and download the 1Sheeld library. Thirdly plug your arduino into your computer. Finally If you have problems uploading your code then take the 1Sheeld+ off of the arduino.
We want the code to be able to sense when the phone is tilting.
The code works by checking every loop to see if the phone has a gravitational acceleration above a theshold in any direction. If it crosses a threshold, it will send 5V down the pin corresponding to the direction that the phone has been tilted, which will turns on the corresponding LED.
Download the code and copy and paste it into your arduino IDE.
or a more in depth explanation of how the code works read the code comments.

Hardware
Make sure that when you connect the LEDs that you place them the right way around so that the positive end (the longer leg) is attached to the power. Attach the shorter leg using the resistor to the common ground.

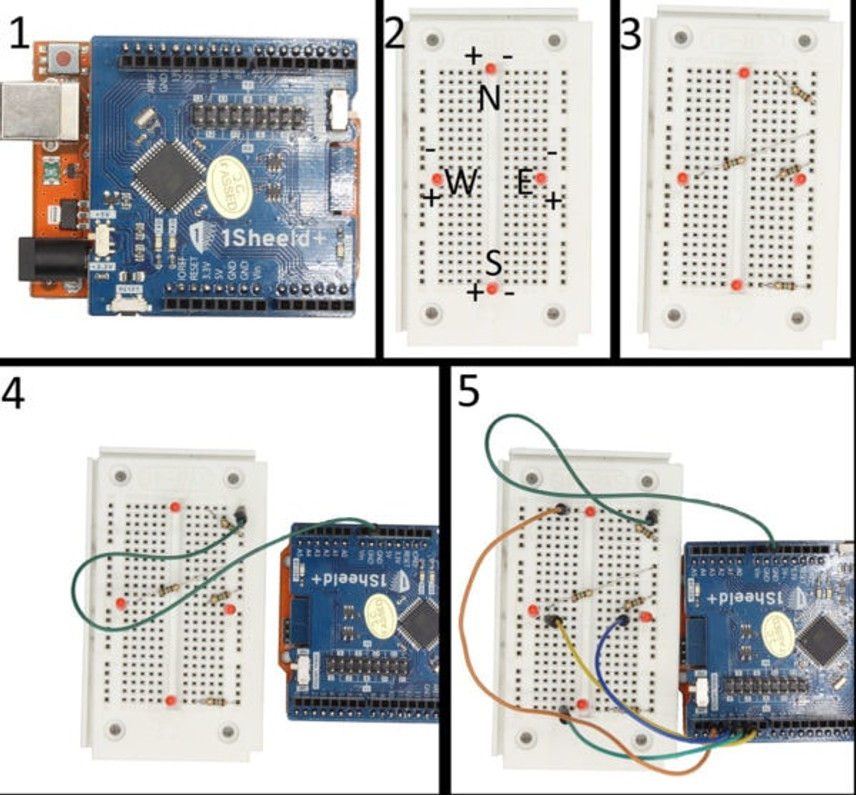
1. Connect the 1Sheeld+ to the Arduino.
2. Connect the LEDs to the breadboard so that all four LEDs are at the compass directions.
3. Connect a resistor to every LED, and to the common ground.
4. Connect the common ground to the Arduinos ground.
5. Connect the North LED to pin 2, East LED to pin 3, South LED to pin 4, West LED to pin 5.
Phone
If you don't already have the 1Sheeld app installed, then go to the Play Store or App Store on your phone and look up 1Sheeld. Download the app shown in the first picture, then follow the instructions on the app.
Scan for your 1Sheeld+, select it, when pairing with your 1Sheeld+ you may be asked for a pairing code, the default pairing code is 1234. Once you're paired, tap to activate the Accelerometer shield, it'll look like the photo in the second photo. Now you should be able to tilt your phone and see the corresponding LED light up. If it isn't lighting up then try flicking the switch labelled either "UART" or "SERIAL" on the 1sheeld+
And with that you've finished the tutorial, now that you know how the 1Sheeld+ works and have some example code, go on and build what you want to build.

The 1Sheeld app as seen in the Play Store.

The 1Sheeld app with the Accelerometer shield selected (Hot tip: tap on the shield you want).
Recent Posts
-
What is Ohm's Law?
Are you curious about how electricity works? Let me introduce you to a very important concept i …9th Mar 2023 -
How do I control a central heating system using an Arduino
To control a heating system using an Arduino, you will need to write a sketch (program) that impleme …7th Feb 2023 -
The Versatility of Slotted Aluminium Extrusions: From Robotics to Camper Van Renovations
In today's ever-evolving world, the need for versatile and adaptable building materials is greater t …25th Jan 2023


