Description
Orange Pi 2G-IoT Main Board
The Raspberry Pi has long been regarded as the king of the hill in the realm of pocket-sized general-purpose computers however there are other options springing up all the time! Our favourite of these is the Orange Pi 2G-IoT Board, and here's why:
Say hello to the Orange Pi, an open-source single-board mini PC, capable of running Android 4.4, Ubuntu or Debian images. Utilizing the impressive RDA8810 SoC (System on a Chip) with an ARM Cortex-A5 32bit CPU and equipped with 256MB LPDDR2 SDRAM, this Pin doesn't lack processing power!
The Orange Pi 2G-IoT has been specifically designed to become an integral part of your IoT projects. This model has full 2G GSM connectivity, enabling you to install a SIM card straight into the device and open up connectivity to the internet. As Well as 2G GSM capability, this board has Bluetooth and WiFi functionality so connecting it up at home is a doddle! In short, the Orange Pi 2G-IoT is really just a touchscreen and battery away from being a common smartphone.
The Orange Pi 2G-IOT is for anyone who wants to start creating with technology – not just consuming it. It's a simple, fun, useful tool that you can use to start taking control of the world around you.
Specifications:
- CPU: ARM Cortex-A5 32bit
- GPU: Vivante's GC860
- 30M Triangle/s, 250M Pixel/s
- Supporting:
- OpenGLES1.1/2.0
- OpenVG1.4
- DirectFB
- GDI/DirecShow
- Memory (SDRAM): Integrated 256MB LPDDR2 SDRAM
- Onboard Storage: TF Card / Integrated 512MB 8Bit 1.8V 4K SLC Nand Flash
- Onboard WIFI+BT: RDA5991 - Wifi +Bluetooth capability
- 2G model: One Card, Featuring four frequencies, GSM/GPRS Dedicated accelerators, SD/MMC Card Slot
- Video Input: CSI input connector Camera
- Supporting:
- 8-bit YUV422 CMOS Sensor Interface
- CCIR656 protocol for NTSC and PAL
- SM pixel Camera Sensor
- Video Capture up to 1080p@30FPS
- Supporting:
- Audio Input: MIC, 3.5 mm Jack
- Video Outputs: LCD
- Audio Outputs: 3.5 mm Jack, FM
- Power Source: USB OTG / Battery Input
- GPIO(1x3) pin: UART, Ground
- USB 2.0 Ports: One USB 2.0 HOST, One USB 2.0 OTG
- Buttons: Power Button (SW602)
- Low-level Peripherals: 2 x 20 Pin Header
- LED: Power LED
- Supported OS: Android, Ubuntu, and Debian
Getting Started with the Orange Pi 2G Main Board:
What do you need to get started?:
- A TF card: Minimum size 8Gb; class 10 (the class indicates how fast the card is)
- We recommend using branded TF cards as they are more reliable
- A Video lead:
- HDMI(Full-sized) to HDMI / DVI lead:
- HDMI to HDMI lead (for HD TVs and monitors with HDMI input) or HDMI to DVI lead (for monitors with DVI input)
- Or an AV video lead:
- A standard AV video lead to connect to your analogue display if you are not using the HDMI output
- A Keyboard and mouse:
- Any standard USB keyboard and mouse should work. Keyboards or mice that take a lot of power from the USB ports, however, may need a powered USB hub. This may include some wireless devices
- An Ethernet cable Or USB WiFi Dongle (Networking is optional, although it makes updating and getting new software for your Orange Pi much easier)
- A DC power adapter or Micro USB power adapter:
- A good quality, DC power or micro USB power supply that can provide at least 2A at 5V is essential
- Optional:
- Audio lead: You can choose a 3.5mm jack audio led to connect to the audio port to get stereo audio
- Mobile Hard disk: You can choose to connect a mobile hard disk to the SATA port to store more files
- HDMI(Full-sized) to HDMI / DVI lead:
In order to enjoy your Orange Pi, you will need to install an Operating System (OS) onto a TF card. The instructions below will teach you how to write an OS image to your TF card under Windows and Linux.
Preparing your TF Card for the Orange Pi (Windows):
- Insert your TF card into your computer (The size of TF should be larger than the OS image size, generally 8GB or greater)
- Format the TF card:
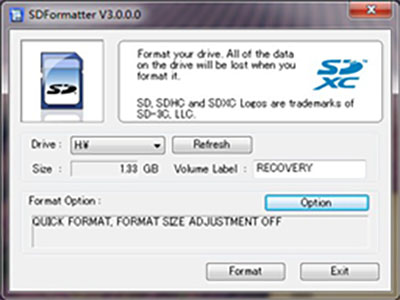
- Download the a TF card format tool such as TF Formatter from
https://www.sdcard.org/downloads/formatter_4/eula_windows/ - Unzip the download file and run the setup.exe to install the tool on your machine.
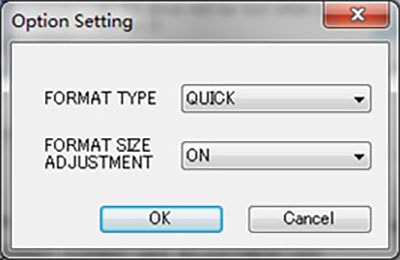
- In the "Options" menu, set "FORMAT TYPE" option to QUICK, "FORMAT SIZE ADJUSTMENT" option to "ON".
- Check that the TF card you inserted matches the one selected by the Tool.
- Click the “Format” button.
- Download the a TF card format tool such as TF Formatter from
3. Download the OS image here:
4. Unzip the download file to get the OS image (Right-click on the file and choose “Extract all”)
5. Write the image file to the TF card:
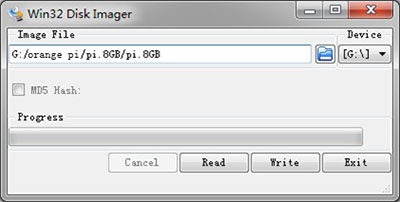
- Download a tool that can write images to a TF card, such as Win32 Diskimager
- Open the unzipped image file
- Click the “Write” button to successfully complete writing
Preparing your TF Card for the Orange Pi (Linux):
- Insert your TF card into your computer (The size of TF should be larger than the OS image size, generally 8GB or greater)
- Format the TF card (x should be replaced according to your TF card node):
- Run fdisk –l /dev/sdx command to check the TF card node
- Run umount /dev/sdxx to unmount all the partitions of the TF card
- Run sudo fdisk /dev/sdx command to configure TF card. Use o command to delete all partition of TF card and use n command to add one new partition. Use w command to save change
- Run sudo mkfs.vfat /dev/sdx1 command to format the new created partition of TF card as FAT32
- You can also jump this step under Linux, because write image command dd under Linux will format the TF card automatically
- Download the OS image here:
- Unzip the download file to get the OS image (exclude android os image, android os image need other burn mode):
- Run unzip [path]/[downloaded filename] command
- If the filename extension is .tgz, run tar zvxf [path]/[downloaded filename] command
- Ensure that neither the file name of the image you're using or the path contain any spaces (or other odd characters, for that matter)
- Write the image file to the TF card (x should be replaced according to your TF card node):
- Run sudo fdisk –l /dev/sdx command to check the TF card node
- Verify if the hash key of the zip file is the same as shown on the downloads page (optional)
- sha1sum [path]/[imagename]
- This will print out a long hex number that should match the "SHA-1" line for the TF image you have downloaded
- Run umount /dev/sdxx to unmount all the partition of the TF card
- Run sudo dd bs=4M if=[path]/[imagename] of=/dev/sdx command to write image file to TF card. Wait patiently to successfully complete writing. Please note that block size set to 4M will work most of the time, if not, please try 1M, although 1M will take considerably longer. You can use sudo pkill –USR1 –n –x dd command to check the progress
Connecting up the Orange Pi 2g IoT:
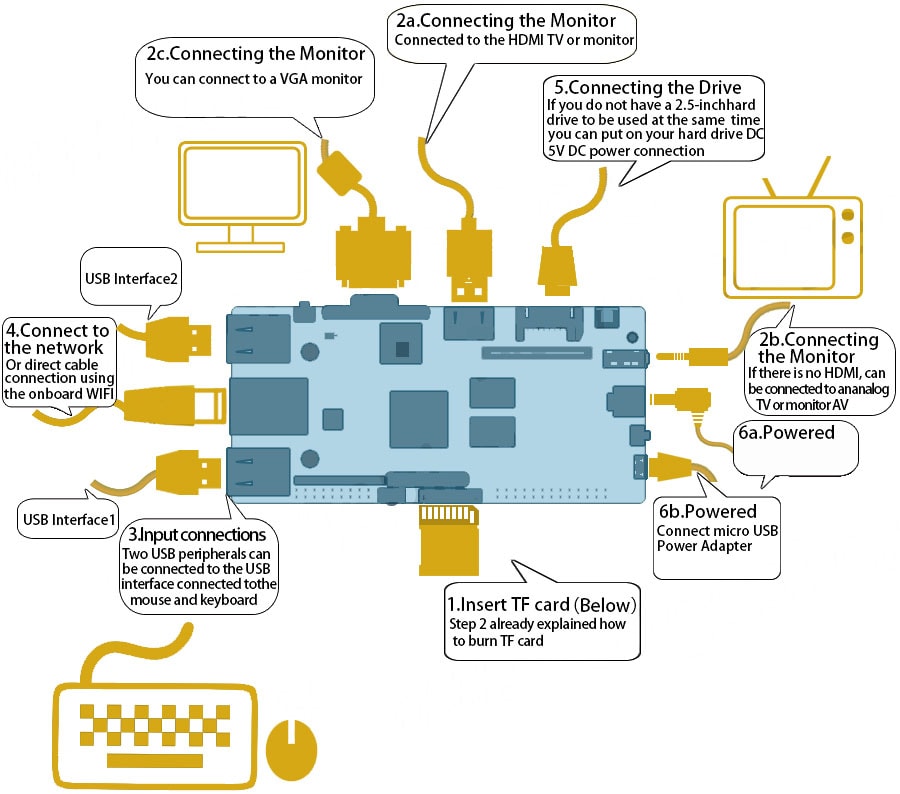
- Insert the written-image TF card into the TF card slot on the bottom edge of the underside of the board.
- On the top edge in the middle of the board is the HDMI Type A (Full-sized) port, just on the left of the SATA port. Just connect any HDMI Type A cable from the board to your TV or HDMI Monitor.
If you don't have a TV/Monitor with an HDMI or DVI-D port you can use the VGA just on the left of the HDMI or use the AV jack located on the right edge topside. - Plug a USB keyboard and mouse into the USB slots located on the left edge.
- Just between the four USB ports on the left edge is the ethernet connector for anyone who wants to plug the Orange Pi into a wired network. You can also use wifi to connect network.
- Finally, on the right edge, under the AV jack is the DC power connector. Plug in a regulated power supply that is rated at 5V ±5% and at least 1500mA (or 2.0A). Any number bigger than 1500 mA will also work. On the right edge, under the power switch is the micro-USB power connector. Avoid using the smaller chargers used for small GSM phones, as these are often unregulated, even if they claim "5V 2A", they may do "5V" and may do "2A", but not at the same time!
Orange Pi Documents


