Sparkfun
Mono Audio Amplifier Breakout TPA2005D1 (BOB-11044)

- SKU:
- PPBOB-11044


Description
Mono Audio Amplifier Breakout TPA2005D1 - Sparkfun BOB-11044
This tiny audio amplifier is based on the Texas Instruments TPA2005D1. Its efficient class-D operation means low heat and long battery life. It can drive an 8-Ohm speaker at up to 1.4 Watts; it won’t shake a stadium, but it will provide plenty of volume for your audio projects.
The fully differential inputs are safe for floating audio signals such as from our MP3 Shield, and can also be connected to ground-referenced signals as well. A shutdown input is provided to save power when the amplifier is not being used, and a solder jumper and header are provided to connect a volume-control potentiometer (not included).
Features:
- Extremely efficient class-D amplifier
- 1.4W into 8 Ohms
- 2.5V to 5.5V supply
- Fully differential audio inputs can be ground-referenced as well
- Shutdown input with pullup and LED-follows-shutdown circuitry
- PTH pads provided to change gain resistors if desired (see datasheet for details)
- Solder jumper and header allow the addition of a 10k volume control potentiometer (not included)
Documents:
Notes:
- The amplifier’s class-D design outputs a 250kHz PWM-like signal that is restored to an analog voltage in the speaker’s coil. This is what makes the amplifier so efficient, but because of the switching frequency, you should keep the amplifier as close to the speaker as possible to minimize possible interference.
Quick Start Guide:
- Connect your line-level audio input to the IN + and - header.
- Connect your speaker to the OUT + and - header.
- Connect 2.5V to 5.5V to the PWR + and - header. (Don't connect anything to the S (shutdown) pin yet.)
Send some audio to the input, and you should hear it on the speaker! If the sound is not loud enough, if you hear buzzing, or if you'd like to add a volume control, read on.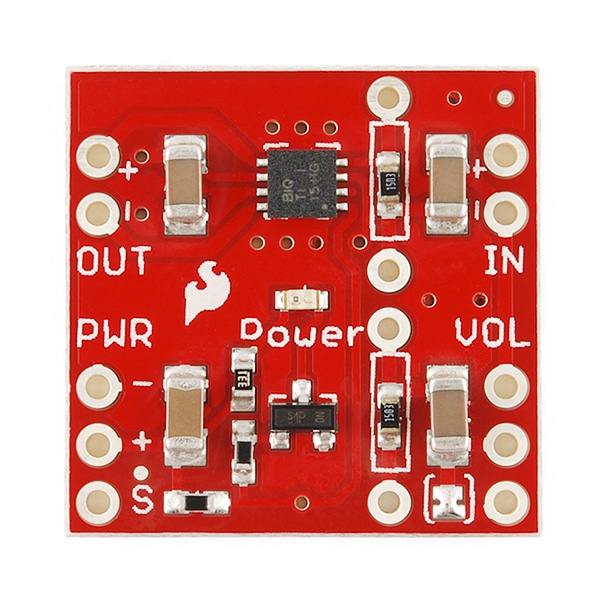
Traditional audio amplifiers use power transistors to multiply an analog input by a certain gain to produce an analog output. This produces great sound, but the transistors must operate in the intermediate region between on and off. Transistors operate most efficiently when they're fully on or off, and waste a lot of energy as heat when they're run in between.
The class-D amplifier is radically different. At any moment its output transistors are either fully on or fully off, which is very efficient. But this means that the output isn't true audio, it's a digital PWM-like waveform that is mostly on (VCC) for high output values, and mostly off (GND) for low output values.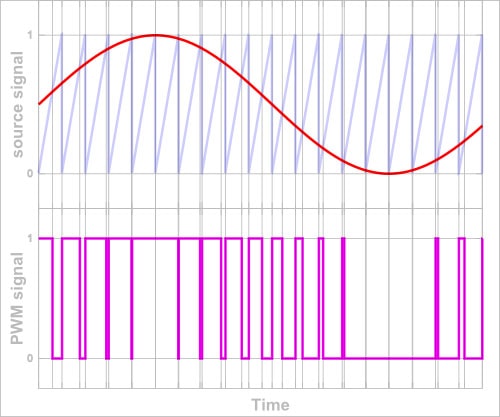
This PWM signal is clocked at 250kHz, which is much higher than the audio frequencies being encoded (< 20kHz). Because speakers are mechanical devices that can only respond to audio frequencies, the PWM signal is effectively filtered back into the original audio frequencies by the speaker coil itself. All you hear is the music!
Check out the TPA2005D1 datasheet in the documents section if you'd like to know more about this amplifier.
To use the amplifier:
Connect your input source to the IN + and - header. Because the inputs are differential, it technically doesn't matter which direction you connect them, but if one of your inputs is ground or shield, connect that line to the - terminal.
Connect your speaker to the OUT + and - header. If you're using one speaker the polarity doesn't matter, but if you'll be using multiple speakers, ensure that you wire them all the same way to avoid phase problems. The speaker can be 4 or 8 Ohms. The maximum output of the amplifier is 1.4 Watts into 8 Ohms. You can drive smaller-wattage speakers with this amplifier, but you should be careful not to turn up the volume too high to avoid damaging the speaker. You can also drive speakers larger than 1.4W at a reduced volume. In general, larger speakers will sound much better than smaller speakers; we've had great luck with old automotive speakers.
Connect a power source to the + and - pins. The power source can be from 2.5V to 5.5V and should be able to source at least 280 milliamps if you want maximum volume. The red LED will illuminate when the board is powered up.
Apply an audio signal to the input, and you should be able to hear it on the speaker. To change the volume, either change the volume of the signal at its source or add a volume-control potentiometer to the board (instructions below).
Adding a volume control knob:
If you wish, you can easily add a 10K volume control potentiometer to this board. The volume control will let you control the volume by reducing the input signal from 100% to 0%. Note that this will not make the amplifier any louder.
Here's how to add a volume control potentiometer:
- Remove the solder from jumper SJ1. This is the small blob of solder within the white brackets on the bottom right of the board. The easiest way to do this is to apply solder wick to the jumper, and heat it with your soldering iron. When you're done, ensure that the two sides are electrically separated from each other.
- Now, connect your 10K potentiometer to the three pads on the lower right of the board. The bottom of the board has silkscreen showing the proper connections and you can add a trimpot.
Note: Potentiometers come in two styles: "linear taper" and "audio (or logarithmic) taper". Audio taper potentiometers have a logarithmic bias that gives a more natural feel in audio volume control applications like this one, but linear taper will also work just fine.
How to use the shutdown pin:
The SDN* input can be used to turn off the amplifier to save power when it's not being used. When SDN* is disconnected, or connected to a high logic signal (> 2V), the amplifier will function normally. When the SDN* pin is connected to ground or a low logic signal (< 0.8V), the amplifier and LED will turn off. You can use this feature to save power in battery-operated projects.
Changing the gain resistors:
The amplifier chip uses two fixed resistors to set the gain, which is how much the input signal will be amplified. On this board, we're using 150K resistors as recommended by the datasheet, for a gain of 2. If you would like the output to be louder, you can install smaller resistors.
The gain equation for this amplifier is 2 * (150K / R). So if you use 100K resistors the gain would be 3, for 50K resistors the gain would be 6, etc. The datasheet states that the smallest value you should use is 15K for a gain of 20, but we've gone down to 3K (gain = 100) with fair results.
The amplifier board has two positions to add your own through-hole resistors. These are within the white rectangles on the top of the board. You do not need to remove the existing surface-mount resistors, just put your through-hole resistors over the top of them. (Leaving the SMD resistors in parallel with the new resistors will slightly reduce the total resistor value, but this is generally not a problem).
For best results, the two gain resistors should be as closely matched as possible. If you have a bag of identical resistors, you might measure them all with a multimeter and pick the two that have the closest resistance.
Tips:
The amplifier's output is only designed to be connected to something with a coil (a speaker or magnetic transducer). Since the output is not a true analog signal, you shouldn't expect to use this board as a preamplifier, etc.
The differential inputs of this board are safe to connect directly to floating-ground audio signals such as from the MP3 Shield and MP3 Trigger.
If your audio source and amplifier have different AC power supplies (such as audio coming from a desktop computer), you may hear a loud hum in the output. To fix this, connect a jumper wire between the - side of the audio input and the power supply ground (PWR - header).
Because the amplifier outputs a 250Khz PWM-like signal, it could potentially radiate interference to nearby sensitive circuitry. For this reason, keep the wires between the amplifier and speaker as short as possible.
Related Products
")
")
RJ45 MagJack Breakout (BOB-13021)
Sparkfun


RJ11 Breakout Board (BOB-14021)
Sparkfun


OpAmp Breakout LMV358 (BOB-09816)
Sparkfun


MAX3232 Breakout Board (BOB-11189)
Sparkfun


SparkFun BOB-09540 L298N Breakout Board
Sparkfun